Adventures in system administration - Part 1
Background
For the past year or so I've been running a bunch of services off of two servers in my apartment. These include several simple websites (including this one) served by Nginx, a Plex server, a few different game servers, and Transmission-daemon behind a VPN. This worked fine for a while, but as my desire to host more things myself grew, the two old HP desktops I had been using couldn't keep up. In May 2019 I decided to upgrade.
This is the first in what I assume will be a long series of blog posts describing in detail the process I used to set up my own network of virtual servers to handle the tasks I want automated for my personal life. The goal is both as documentation for my own purposes, and as a guide so others can do the same thing.
Hardware
I bought a used Dell PowerEdge R710 2U rack server based on online recommendations, with 32 GB of RAM and two Intel Xeon E5620 CPUs. The RAID controller it came with could only handle drives up to 2 TB, so I swapped it out with a PERC H700. I also bought two 1 TB hard drives to use in a RAID 1 array for important OS data, and an 8 TB drive for low priority storage. I plan to buy more 8 TB hard drives for expanded storage and backups, but this will do for now.

Software
I'll be using CentOS 7 for both host and guest operating systems. This is because it's based on Red Hat Enterprise Linux, which has wide support in a lot of server-based applications, and also because my prior experience with Ubuntu server left me feeling annoyed.
For virtualization technology I'm using KVM/QEMU. I tried using Spacewalk/Cobbler for system provisioning, but couldn't quite get it set up right, so I switched to Foreman.
With that out of the way, let's get right into setting it up.
Step 1: Setting up the host
The first step is obviously to install the operating system, so head over to centos.org and grab an ISO. I went for the minimal version because I don't need a GUI. That install is pretty straightforward, so the next step is setting our host up as a KVM hypervisor.
Note: make sure your system is up to date with:
# yum upgrade
before proceding.
Install KVM
This is simple enough if you know what packages to grab:
# yum install qemu-kvm libvirt libvirt-python \
libguestfs-tools virt-install
Next we have to start the libvirtd service, and "enable" it so it starts on boot.
# systemctl enable libvirtd
# systemctl start libvirtd
Create network bridge
We want our virtual machines to be able to talk to real machines outside
their virtual network, so we need to set up a network bridge for them.
By default KVM sets up a NAT'd private network for VMs, which can be
seen with virsh net-dumpxml default. We don't want our VMs
to be hiding behind NAT, so you can just leave that alone for now.
CentOS 7 uses NetworkManager, wich supports network bridges. We still have to install a new package to use them though:
# yum install bridge-utils
To set up our brige, we'll have to edit a couple of config scripts.
cd into /etc/sysconfig/network-scripts and
edit the file corresponding to your physical network interface. Mine is
called em1, so I edited ifcfg-em1. Make a backup of this
file somewhere safe, then edit it so it looks like this:
DEVICE=em1
NAME=em1
HWADDR="05:2a:cd:d6:d9:c3"
NM_CONTROLLED=yes
ONBOOT=yes
TYPE=Ethernet
BRIDGE=br0
Note: make sure you replace the MAC address above with your
interface's real MAC address. It can be seen with ip a.
Next, we'll create a config script for our bridge, in the same directory
(/etc/sysconfig/network-scripts/ifcfg-br0). Make it look
like this:
DEVICE=br0
NAME=br0
NM_CONTROLLED=yes
ONBOOT=yes
TYPE=Bridge
STP=off
DELAY=0

IPADDR=192.168.1.25
NETMASK=255.255.255.0
GATEWAY=192.168.1.1
DNS1=192.168.1.1

IPV6INIT=yes
IPV6_AUTOCONF=no
IPV6ADDR=2001:db8::1
IPV6DEFAULTGW=fe80::1%br0
You'll likely have to change the IPADDR, NETMASK, and GATEWAY entries above to fit your actual network. Restart the networking service and we'll be good to go:
# nmcli connection reload
# nmcli connection down em1 && \
nmcli connection up em1
You might want to reboot the machine as well to make sure everything
comes back up correctly. You can verify that everything worked by
running brctl show. You should see a bridge named
br0 and one called virbr0. The latter is the
bridge Libvirt created for its default network.
We could start creating VMs now, but first we want to install Foreman to automate a lot of the work associated with that.
Install Foreman
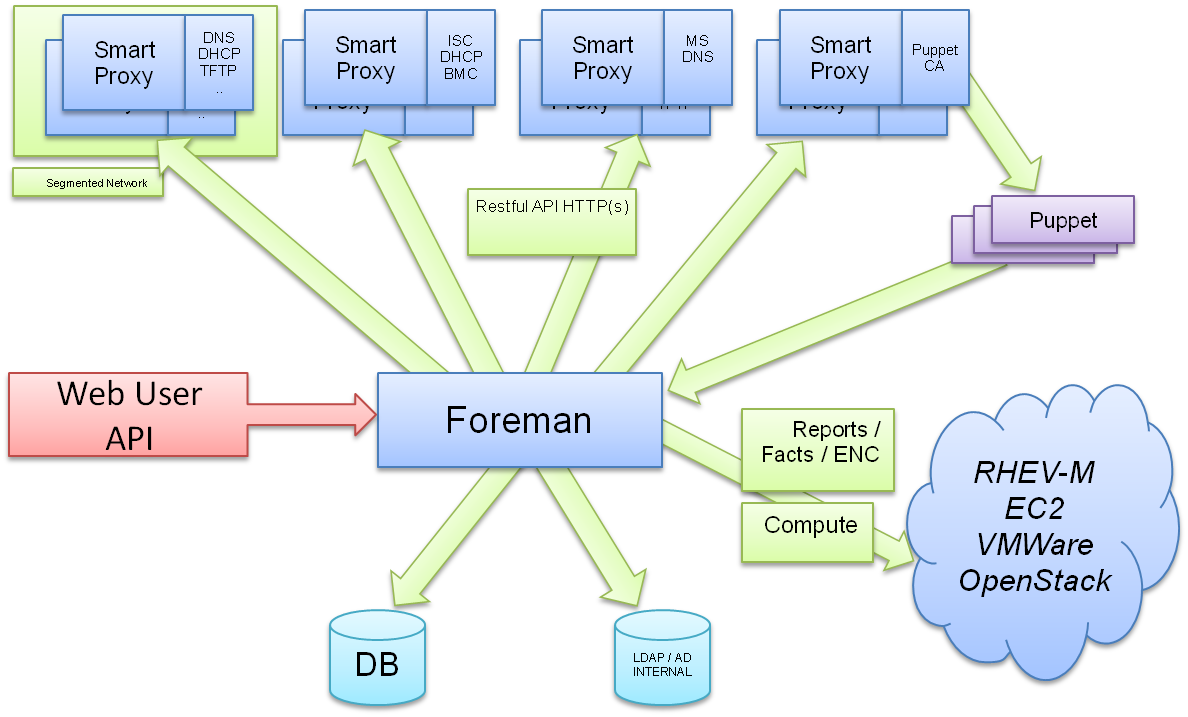
Foreman is a big confusing piece of software that includes a lot of moving parts, but it will make our lives easier in the future when we have a fleet of VMs running different services and want to be able to create more on the fly without any direct interaction.
The Foreman installer uses Puppet to install Foreman, so first we need to install Puppet:
# yum install https://yum.puppet.com/puppet6-release-el-7.noarch.rpm
Then, enable the Extra Packages for Enterprise Linux (EPEL) and Foreman repos:
# yum install http://dl.fedoraproject.org/pub/epel/epel-release-latest-7.noarch.rpm
# yum -y install https://yum.theforeman.org/releases/1.22/el7/x86_64/foreman-release.rpm
Download the installer:
# yum install foreman-installer
Before we run the installer, we have to make sure we have our
Fully-Qualified Domain Name set up correctly. The FQDN includes the
machine's hostname and an internet domain that points to it. For
example, if my server is named steve, the FQDN could be
steve.example.com. To update the hostname, run:
# hostnamectl set-hostname steve
Then edit /etc/hosts. Add a line to it that looks like
this:
1.2.3.4 hostname.example.com hostname
Make sure you replace 1.2.3.4 with the computer's real internal IP address though.
With that done, we can run the installer.
# foreman-installer
When it's finished you should get a block of text like this:
Success!
* Foreman is running at https://hostname.example.com
    Initial credentials are admin / aUaMiCRtLFXikhAF
* Foreman Proxy is running at https://hostname.example.com:8443
* Puppetmaster is running at port 8140
The full log is at /var/log/foreman-installer/foreman.log
If you can't reach the web interface at the given address, make sure the correct ports are open on your server:
# firewall-cmd --zone=public --add-service http --permanent
# firewall-cmd --zone=public --add-service https --permanent
There are also a few other ports Foreman needs you to have open:
# firewall-cmd --zone=public --add-port 69/udp --permanent
# firewall-cmd --zone=public --add-port 8140/tcp --permanent
Now, if you log in to the Foreman web interface with the credentials you received from foreman-installer, you should be able to go to the Hosts tab and see your Foreman host. You should take this opportunity to set a new, secure password.
Now that we have the host machine configured and set up, that's enough for today. Next time we'll get into provisioning our virtual machines and setting up fun stuff like LDAP and DHCP.